Introduction
Noticing your water heater leaking from top can feel alarming—but the good news is, most causes are fixable. Whether it’s a loose connection, pressure valve malfunction, or corrosion, this guide gives you a complete, step-by-step breakdown of what’s going wrong and how to fix it safely. You’ll also learn how to prevent leaks in the future with smart, U.S.-based maintenance practices. Let’s get to the root of the problem—fast.
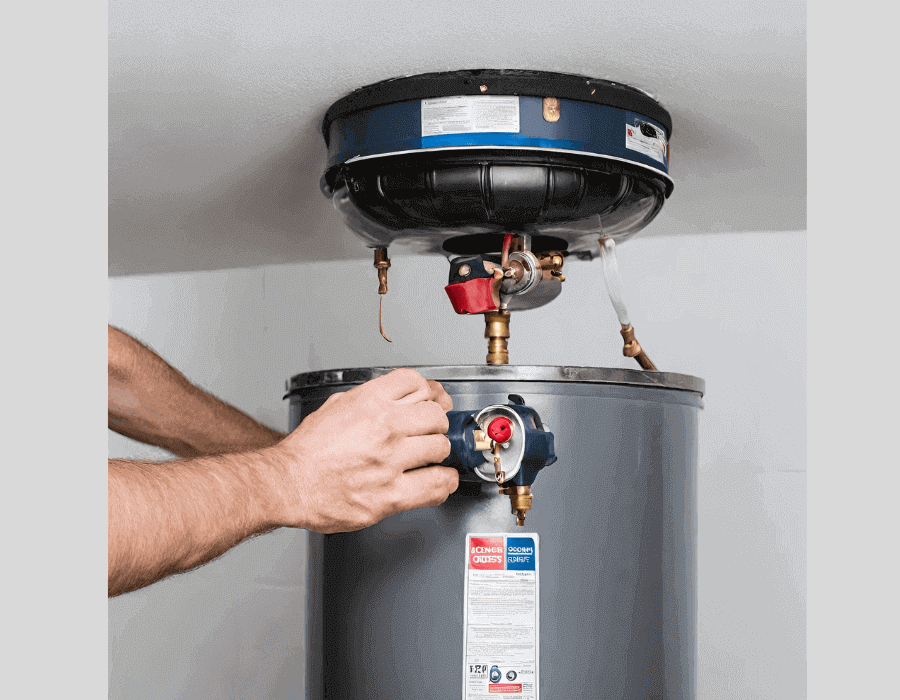
What’s Located at the Top of Your Water Heater?
Understanding what components sit at the top of your water heater is essential for diagnosing the leak. These include:
- Cold water inlet valve
- Hot water outlet pipe
- Temperature and pressure relief (T&P) valve
- Anode rod or dip tube access port
- Possibly an expansion tank (for thermal expansion control)
Leaks originating at the top usually indicate issues with one of these components rather than a problem with the main tank body.
1. T&P Valve Failure or Dripping
The T&P valve is a safety device that relieves pressure if the tank becomes too hot or pressurized. If it’s dripping from the top, it may be due to:
- Excess pressure inside the tank
- A faulty or worn-out valve
- Improper installation or blocked discharge line
Fix:
- Turn off power and cold water supply
- Release tank pressure by opening a nearby hot water tap
- Inspect the T&P valve for debris or scale buildup
- Replace the valve if dripping continues
A leaking T&P valve should never be ignored—it can indicate dangerously high pressure levels inside your system.
2. Leaking Inlet or Outlet Connections
Over time, the fittings where cold water enters and hot water exits can become loose or corroded. This is a very common cause of top leaks.
Symptoms:
- Dripping or pooling water around pipe joints
- Corrosion or mineral buildup at fittings
Fix:
- Gently tighten the connections with a wrench
- If tightening doesn’t stop the leak, turn off the water and replace the affected pipe or nipple
- Use proper pipe sealant or Teflon tape when reattaching connections
Be careful not to overtighten, as this can crack pipes or fittings.
3. Corroded Anode Rod Port
The anode rod, accessible from the top of the tank, helps prevent internal corrosion. When the rod deteriorates, it can create a path for leaks if the seal breaks down.
Fix:
- Drain a few gallons from the tank
- Remove the rod using a socket wrench
- Check for corrosion or wear
- Replace the rod and reseal the port if needed
A worn-out anode rod should be replaced every 3–5 years, especially in areas with hard water.
4. Expansion Tank or Pressure Problems
In homes with closed-loop plumbing systems, an expansion tank helps manage pressure as water heats and expands. If this tank fails, it can cause pressure to build in the main water heater and force water out of top components.
Fix:
- Check air pressure in the expansion tank with a tire gauge
- Recharge or replace the tank if pressure is out of balance
- If your system doesn’t have one, consider having one installed
This is especially important in areas with municipal water systems and backflow prevention devices.
5. Condensation (Not a Leak)
Sometimes, what appears to be a leak is actually condensation. This is common when cold inlet pipes meet warm, humid air, especially in unheated basements or garages.
Fix:
- Dry the area thoroughly
- Insulate cold water pipes
- Improve ventilation or install a dehumidifier
Wait a few hours and check again. If no new water appears, it was likely just condensation.
Step-by-Step Troubleshooting Guide
- Turn off power to the water heater (breaker or gas valve)
- Shut off cold water supply using the valve above the tank
- Dry the top of the tank thoroughly with a towel
- Watch closely to identify where water reappears
- Inspect each component (T&P valve, inlet, outlet, anode rod) for visible moisture or corrosion
- Tighten or replace parts as needed using safe DIY methods
- Test the system after each change by restoring water and observing the area
- Don’t ignore rust, bubbling, or tank body leaks—these indicate internal damage and require replacement
When You Should Call a Professional
There are situations where DIY isn’t worth the risk. Call a plumber if:
- The tank itself is leaking
- The unit is 10–12+ years old
- Electrical or gas work is required
- You see signs of mold, water damage, or excessive corrosion
- You don’t feel confident identifying the issue
A licensed plumber can inspect, diagnose, and perform code-compliant repairs or replacement quickly and safely.
How Much Will It Cost in the U.S.?
- T&P Valve Replacement: $100–$200 (parts and labor)
- Inlet/Outlet Repair: $50–$300
- Anode Rod Replacement: $100–$250
- Expansion Tank Installation: $150–$300
- Full Tank Replacement: $900–$1,800+
Repair is usually worth it if your unit is under 8 years old. Beyond that, replacement may be more cost-effective and energy-efficient.
U.S. Maintenance Checklist to Prevent Top Leaks
To extend your water heater’s life and avoid future leaks, follow this annual routine:
- Flush the tank to remove sediment buildup
- Test the T&P valve by lifting the lever briefly
- Check inlet/outlet fittings for tightness and signs of corrosion
- Inspect the anode rod and replace it every 3–5 years
- Install an expansion tank if required by local codes
- Keep pipes insulated, especially in unheated areas
- Set the temperature to 120°F to reduce pressure stress
Most Common Mistakes Homeowners Make
- Ignoring small drips until they cause serious damage
- Overtightening fittings, which can crack components
- Replacing only visible parts, not addressing the root pressure issue
- Skipping maintenance, which leads to early failure
- Attempting gas or electrical repairs without experience
Avoiding these mistakes can save thousands in property damage due to water heater leaking from top or water heater replacement costs.
Final Thoughts
If your water heater is leaking from the top, take it seriously—but don’t panic. Most issues can be traced to fittings, valves, or corroded ports. With quick action, smart troubleshooting, and regular care, you can fix the problem yourself or decide when it’s time to bring in a professional. Remember: what starts as a slow drip can turn into a flooded floor if left unchecked.
You may also like: Tankless Water Heater Maintenance or click below: